certbit のDNS01 認証のメリット
DNS認証すると、ワイルドカード証明書が使えるようになる。
DNSで認証すると、WEBサーバーのポートを開けなくて良い。
ただし、TXTレコードを使う必要がある。プラグインが別途必要
プラグインのインストールする
最近のDebian/Ubuntuは certbotプラグインがAPTで提供されており、各種DNSサービスに対応している。
sudo apt install python3-certbot-dns-cloudflare
takuya@:~$ apt list *certbot-dns*
一覧表示... 完了
python-certbot-dns-cloudflare-doc/stable 1.6.0-1 all
python-certbot-dns-digitalocean-doc/stable 1.3.0-1 all
python-certbot-dns-dnsimple-doc/stable 1.3.0-1 all
python-certbot-dns-gehirn-doc/stable 1.3.0-1 all
python-certbot-dns-google-doc/stable 1.11.0-1 all
python-certbot-dns-linode-doc/stable 1.7.0-1 all
python-certbot-dns-ovh-doc/stable 1.3.0-1 all
python-certbot-dns-rfc2136-doc/stable 1.10.1-1 all
python-certbot-dns-route53-doc/stable 1.3.0-1 all
python-certbot-dns-sakuracloud-doc/stable 1.3.0-1 all
python3-certbot-dns-cloudflare/stable,now 1.6.0-1 all [インストール済み]
python3-certbot-dns-digitalocean/stable 1.3.0-1 all
python3-certbot-dns-dnsimple/stable 1.3.0-1 all
python3-certbot-dns-gandi/stable 1.2.5-3 all
python3-certbot-dns-gehirn/stable 1.3.0-1 all
python3-certbot-dns-google/stable 1.11.0-1 all
python3-certbot-dns-linode/stable 1.7.0-1 all
python3-certbot-dns-ovh/stable 1.3.0-1 all
python3-certbot-dns-rfc2136/stable 1.10.1-1 all
python3-certbot-dns-route53/stable 1.3.0-1 all
python3-certbot-dns-sakuracloud/stable 1.3.0-1 all
cloudflare で試してみる。
プラグインをインストールする
sudo apt install python3-certbot-dns-cloudflare
root に昇格しつつ、cloudflareのDNS-APIを使ってTXTレコードで認証を行う。
sudo su
mydomain=ovpn.example.biz
certbot=$(which certbot)
$certbot  \
  certonly \
 -n \
 --cert-name $mydomain \
 --dns-cloudflare \
 --dns-cloudflare-credentials /etc/letsencrypt/cloudflareapi.cfg \
  -d $mydomain \
  -d "*.$mydomain"  \
任意のパスで cloudflareのAPIキーを設置する 。私は、/etc/letsencrypt/cloudflareapi.cfgとした
/etc/letsencrypt/cloudflareapi.cfg
dns_cloudflare_email =  admin@example.tld
dns_cloudflare_api_key = xxx4784xxxxx
CloudflareのAPIキーには2種類のAPIキーがある。以前からある。メールアドレスとペアになる以前からのキーと、権限を設定したAPIトークンである。上記は、APIキーの場合。
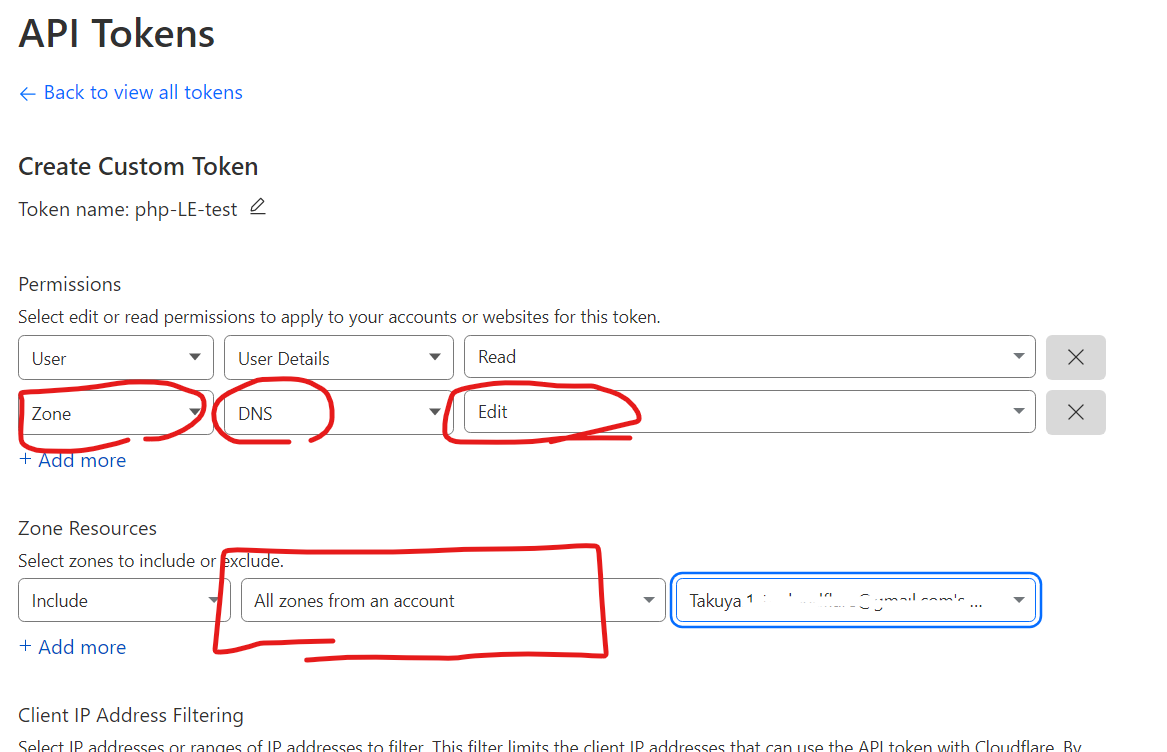
APIトークンを使う場合は、管理画面から編集権限を付与し、キーをファイルに書く(詳しくは以前の記事
ファイルにはキーのみを書く
/etc/letsencrypt/cloudflare-key.cfg
XXXADFDFXXX
Apt版の特徴(systemd)
apt 版を使うと、自動更新用のsystemdユニットが同時にインストールされる。
systemctl status certbot.timer
systemctl status certbot.service
これはとても便利である。
ただ、不要な証明書をいつまでも更新し続けるので、不要になったら証明書をちゃんと消しておくという運用が必要になる。
必要に応じてtimer を書き換えたり、停止してcronで自分のスクリプトで置き換えるなどの考慮も必要になる。
更新時の設定
systemd ユニットで自動更新が、certbot renew で行われることがわかったが、renew 時にDNSプラグインを使うことをどこに保存しているのか。それは /etc/letsencrypt/renewal フォルダに証明書名ごとに設定が保存されている。
ls /etc/letsencrypt/renewal
例えば、次のようになっている。
証明書名ごとに設定ファイルが作られており
cat /etc/letsencrypt/renewal/example.tld.conf
ファイルの中身は次のような感じだった。
# renew_before_expiry = 30 days
version = 1.12.0
archive_dir = /etc/letsencrypt/archive/example.tld
cert = /etc/letsencrypt/live/example.tld/cert.pem
privkey = /etc/letsencrypt/live/example.tld/privkey.pem
chain = /etc/letsencrypt/live/example.tld/chain.pem
fullchain = /etc/letsencrypt/live/example.tld/fullchain.pem

# Options used in the renewal process
[renewalparams]
account = xxxxxxxxf6c7xxxxx
authenticator = dns-cloudflare
dns_cloudflare_credentials = /etc/letsencrypt/cloudflareapi.cfg
server = https://acme-v02.api.letsencrypt.org/directory
このように、どのディレクトリに格納されているキーをどのアカウントで更新し、プラグインを使う(authenticator)が設定されていた。
certbotは上記の設定を使うように構成されているようだ。
むかし、自分でプラグインをpipでインストールしていたときから比べて、随分と便利になった。